How to Create and Maintain a Stiff Sourdough Starter
Learn how to create and maintain a stiff sourdough starter with minimal effort. A strong and active sourdough starter is the foundation of successful sourdough baking. This easy guide takes you through every step of the process.
Equipment
- Digital kitchen scale - for best results, always weigh your ingredients. It's more accurate than measuring by volume.
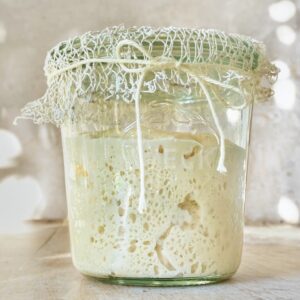
- Glass jar with lid - I like to use Weck 0.5 liter jars. It's the perfect size to keep a smaller starter and has a wide mouth which makes mixing the starter a lot easier.
- Silicone spatula or spoon - to mix the water and flour.
Ingredients
- 70 g Light Rye Flour I recommend using a mix of light rye flour and all-purpose flour. Rye flour provides more nutrients to boost your starter and kick-start the fermentation process. Once your starter is strong and well established, you can maintain and refresh it with any flour of your choice. I, personally, keep a wheat starter, as I've found that it produces a milder taste is more versatile to use in different recipes.
- 340 g All-purpose Flour Look for a protein content of 11-12 %
- 260 g Water Lukewarm (around 30° C)
- Raw honey - optional but recommended. Raw honey contains wild yeasts and beneficial bacteria to speed up the fermentation process.
Instructions
How to Create a Stiff Sourdough Starter From Scratch
Day 1
- In a glass jar, mix 20 g of light rye flour with 20 g of lukewarm water and a bit of honey. Stir until well combined. Cover loosely with a lid and let it sit in a warm spot (ideally 26 -30° C) for about 12 hours. In the winter, you can place it in the oven with a bottle of hot water on the bottom rack to create a nice and warm environment.
- In the evening, give it a good stir and let it rest in a warm spot overnight. Stirring it down redistributes the food for the bacteria and boosts fermentation activity.
Day 2
- Add 20 g of light rye flour, 20 g of lukewarm water and a tiny bit of honey to the jar. Stir to combine and let it rest in a warm spot.
- In the evening, stir it down again.
Day 3
- Discard half of the starter mixture and add 20 g of rye flour, 20 g of lukewarm water and a tiny bit of honey. Stir well to combine.
- in the evening, stir it down again.
Day 4
- Discard half of the starter. Add 10 g of rye flour, 10 g of all-purpose flour, 20 g of lukewarm water and a bit of honey. Mix well to combine.
- In the evening, stir it down again.
Day 5
- Remove all but 30 g of the starter. Add 30 g of lukewarm water and 30 g of flour. Mix well to combine. You can continue to feed it with a blend of rye and all-purpose flour or switch to using only wheat (or any flour of your choice).
- Stir it down in the evening.
Day 6
- Discard everything but 30 g of the starter and add 30 g of lukewarm water. Dissolve the water in the starter and add and 60 g of flour. The texture of the starter will now be similar to bread dough. Use a fork to bring everything together into a shaggy dough, and then briefly knead until smooth and well combined. The consistency of the starter is quite firm and easy to work with, so it shouldn't stick your hands. Put it back in the jar and let it rest.
- In the evening, repeat the same steps as in the morning.
Day 7
- Repeat the same steps as on Day 6 and feed in the morning and evening. Observe your starter and take note of how quickly it rises and falls. At this stage, your starter should show consistent signs of fermentation (doubling in size, lots of air bubbles, a mildly sour and yoghurt-like aroma). If your starter reliably rises and doubles in size within 4-6 hours after feeding, it's a good indicator that it's active and ready to use.
Day 8 and Onward
- Discard everything but 30 g of the starter and add 30 g of lukewarm water. Dissolve the starter in the water and add 60 g of flour. Mix with a fork to bring it together into a shaggy dough, and then briefly knead until well combined. Let it rise in a warm spot. The starter is active and ready to use when it has significantly grown in size (doubled or even tripled), contains lots of air bubbles, has a pleasant dairy-like aroma and a slightly domed top. If it's not active yet, continue to feed it twice daily for a few more days. Congrats! When your stater is active your are ready to bake your first sourdough bread.Alternatively, if you don't want to bake yet, store your starter in the fridge and follow my simple sourdough maintenance routine explained below.
How to Maintain a Stiff Sourdough Starter
- Discard everything but 30 g of the starter. Add 30 g of lukewarm water and dissolve the starter in the water. Add 60 g of flour and use a fork to bring everything together into a shaggy dough. Briefly knead until smooth and well combined. Place it back in the jar and cover loosely with the glass lid.
- Let it rise in a warm spot (26-30° C) until ripe and doubled in size. In a warm environment, this usually takes anywhere from 4 - 6 hours. In lower temperatures it will take longer.
- Remove the amount of starter required for a recipe and make bread dough.
- Place the jar with the remaining starter (about 30 g) in the fridge for the next use.
- Feed your starter when you plan to bake again and repeat the process. This is an ongoing cycle, so whenever you make bread, you only keep a small amount of the remaining starter and store it in the fridge. This small amount of starter will then be replenished with fresh flour and water, left to rise and turns into the leaven for your next bread. Then you'll keep a small amount of the new leaven, store it in the fridge and the cycle repeats.