
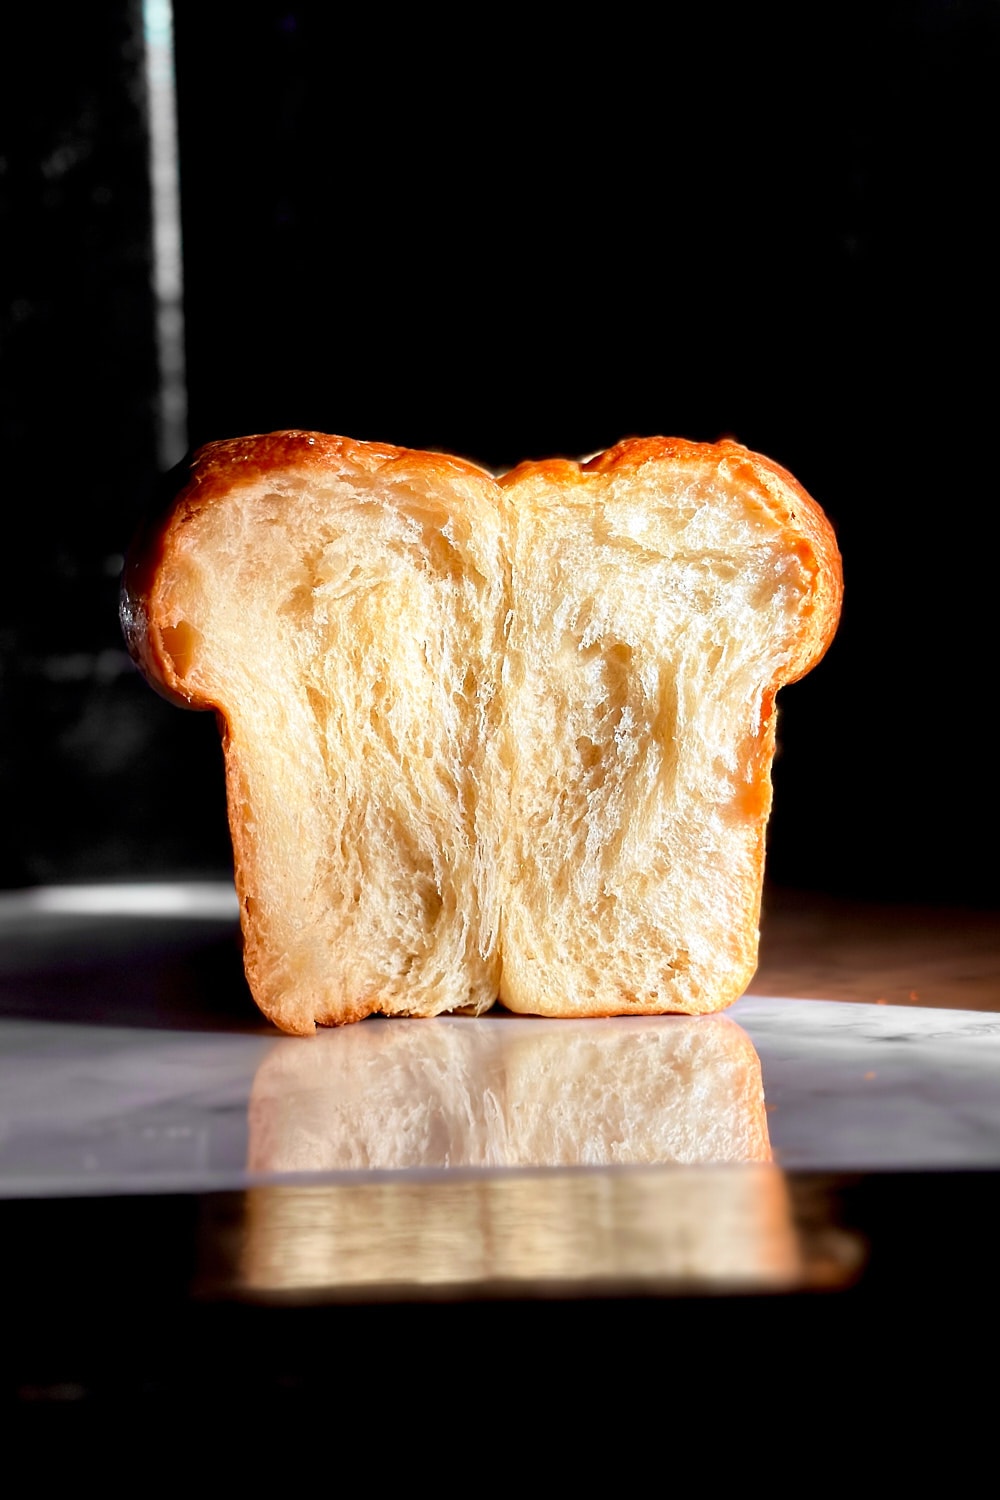
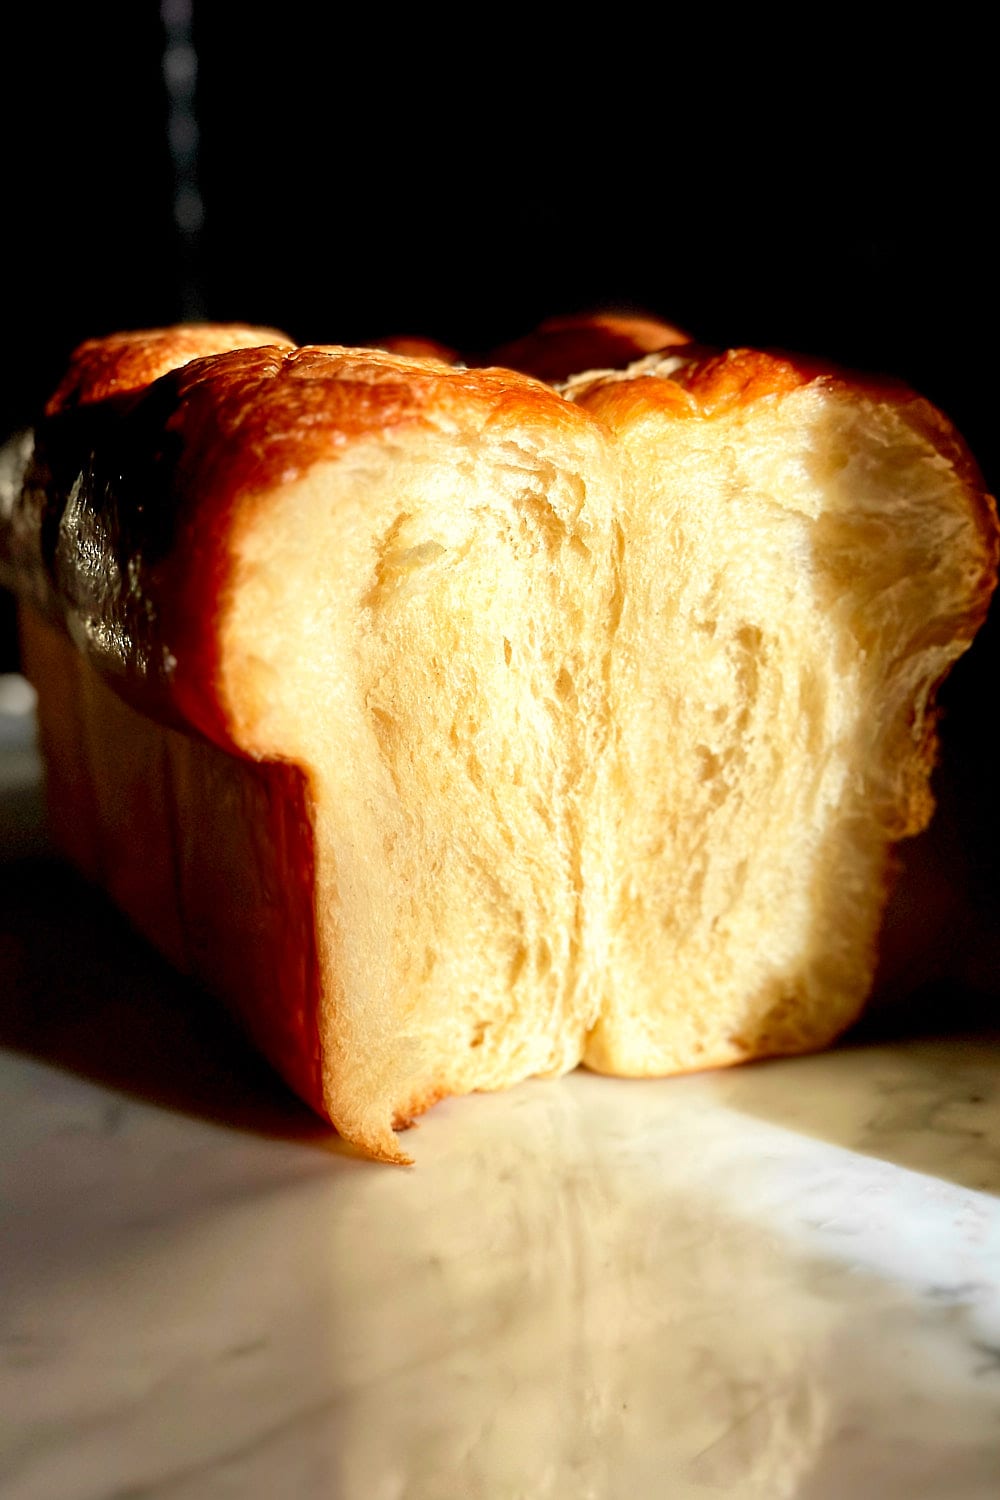
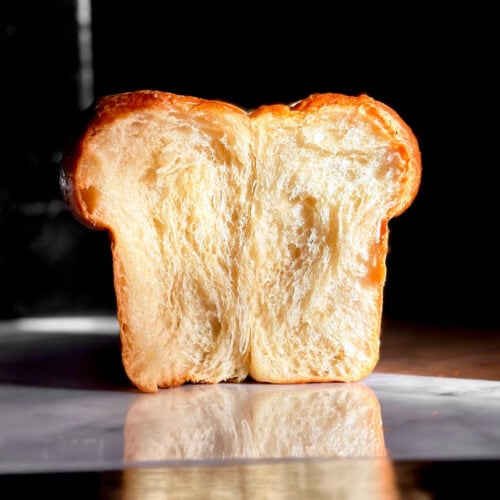
Rich and Buttery Sourdough Brioche
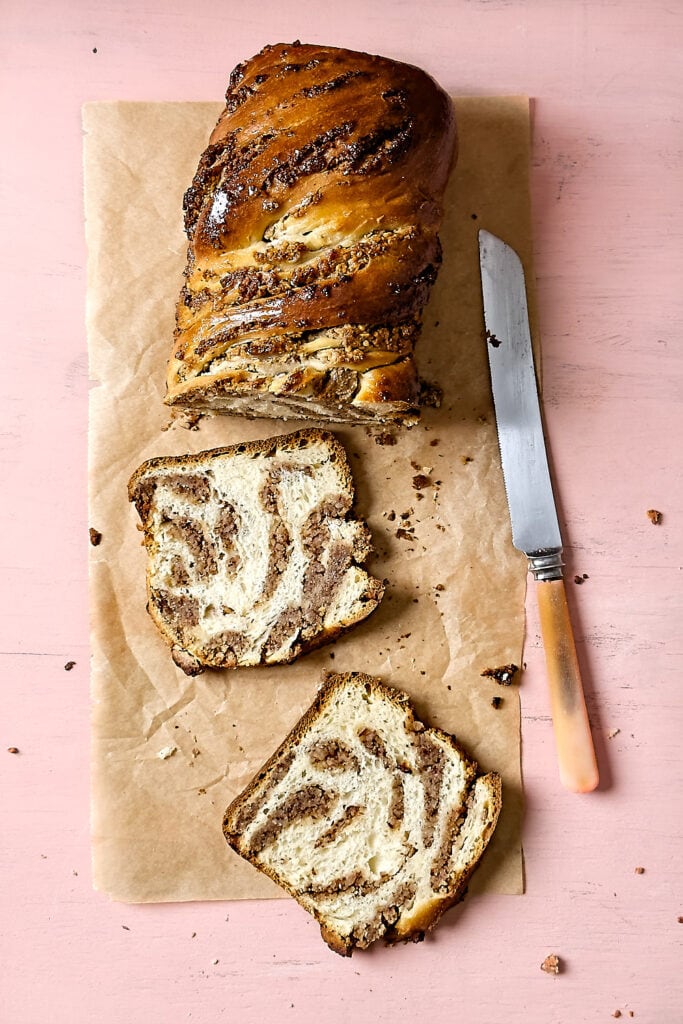
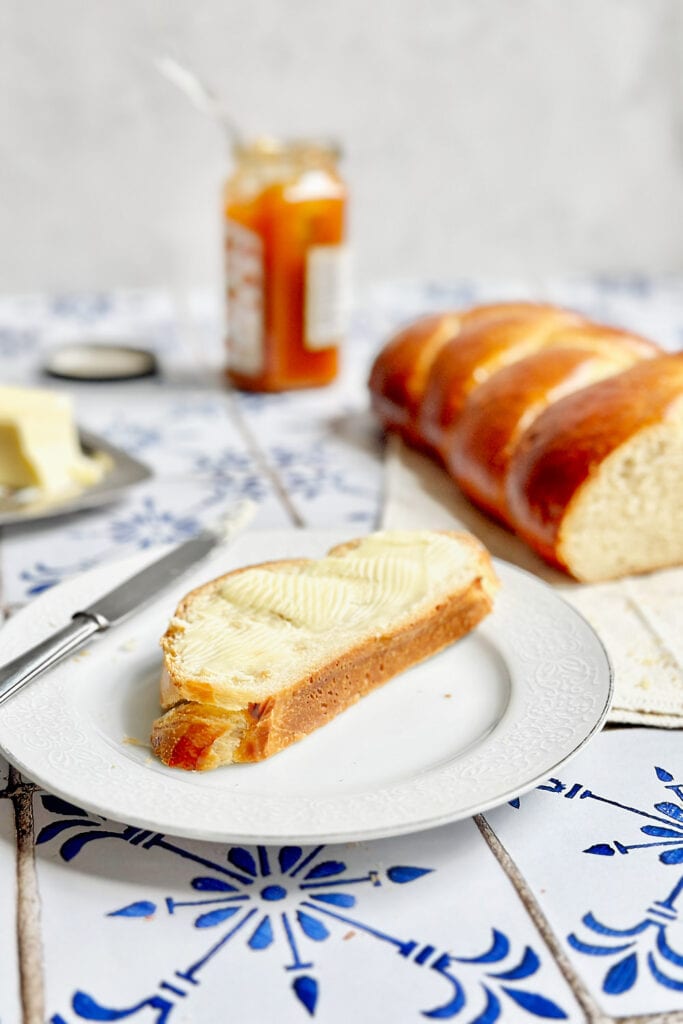
This sourdough brioche is a decadent, enriched French bread. Brioche is known for its soft, tender crumb and slightly sweet, buttery flavor. The high amount of butter and eggs in this recipe results in a melt-in-your-mouth texture and a soft, almost cake-like interior with a beautiful golden hue. It tastes delicious on its own or toasted with butter and jam. It’s also great for making French toast. If you like slightly sweet and enriched breads, you might also like this Swiss-style braided sourdough bread, this cinnamon raisin sourdough bread, or this hazelnut sourdough babka.
Note: It takes two days to make this brioche. But don’t worry, most of it is hands-off time, while the dough is resting. On the first day, you will make the dough and shape the brioche. Then, you let it rest in the fridge overnight. On the second day, you will finish proofing the dough and bake the bread.
Ingredients and Tools You’ll Need
Step-by-Step Instructions to Make Sourdough Brioche
Day 1 | Step 1:
Make the leaven: In a mason jar, combine the sourdough starter, lukewarm milk, and sugar. Stir until the starter is almost fully dissolved. Then add the flour and mix until fully incorporated. The leaven will have a stiff, dough-like consistency. To make sure that the ingredients are well combined, you can also briefly knead it on the counter until it feels smooth and elastic. Then, place it back in the jar and cover it loosely with a lid. Let it rise in a warm spot (28 ° C – 30 °C) for about 4 – 6 hours. The leaven is active and ready to use when it has doubled (or tripled) in size, looks bubbly and airy, and has a mild, slightly sweet aroma. Please keep in mind that the time to rise may vary depending on your room temperature and the activity of your starter. If your room temperature is on the cooler side, you can let the leaven rise in the oven with just the light turned on to speed up the process.
Day 1 | Step 2:
Make the main dough: Add the active leaven, eggs, milk, and sugar to the bowl of a stand mixer fitted with the paddle attachment. Mix on medium speed until the leaven is fully dissolved, and the mixture looks airy and frothy.
Day 1 | Step 3:
Switch from the paddle attachment to the dough hook and add the flour to the mixing bowl. Mix on low speed for a couple of minutes until the flour is fully incorporated. At this point, the dough will feel slack and quite sticky, but don’t worry; it will become smooth and elastic later on during the kneading process. Avoid adding any more flour at this stage, or the dough will become too dry. Cover the bowl with a damp tea towel and let it rest on the counter for about 30 minutes. This allows the flour to fully absorb the liquids and jumpstarts gluten development. While the dough is resting, take the butter out of the fridge and cut it into small cubes.
Day 1 | Step 4:
Add the salt and knead the dough on low-medium speed for about 5 minutes. Then, while the mixer is running, add the butter cubes, one by one, until the butter is fully incorporated. Increase the speed to medium-high and knead the dough until it becomes smooth and elastic. Depending on your mixer, it may take up to 30 minutes to develop enough dough strength. You’ll know the dough is fully developed when it releases from the sides of the mixing bowl and clings to the dough hook. After kneading, the dough should feel soft and smooth. It will have a slightly shiny surface and might feel slightly tacky but no longer overly sticky.
Day 1 | Step 5:
After mixing, place the dough in a lightly greased bowl and cover it with a damp tea towel or plastic wrap. Let it bulk ferment in a warm spot (ideally between 26 – 28 degrees) for about 4 hours. By the end of the bulk fermentation, the dough should look aerated with many small, visible bubbles throughout, but it doesn’t have to double in size during this time.
Day 1 | Step 6:
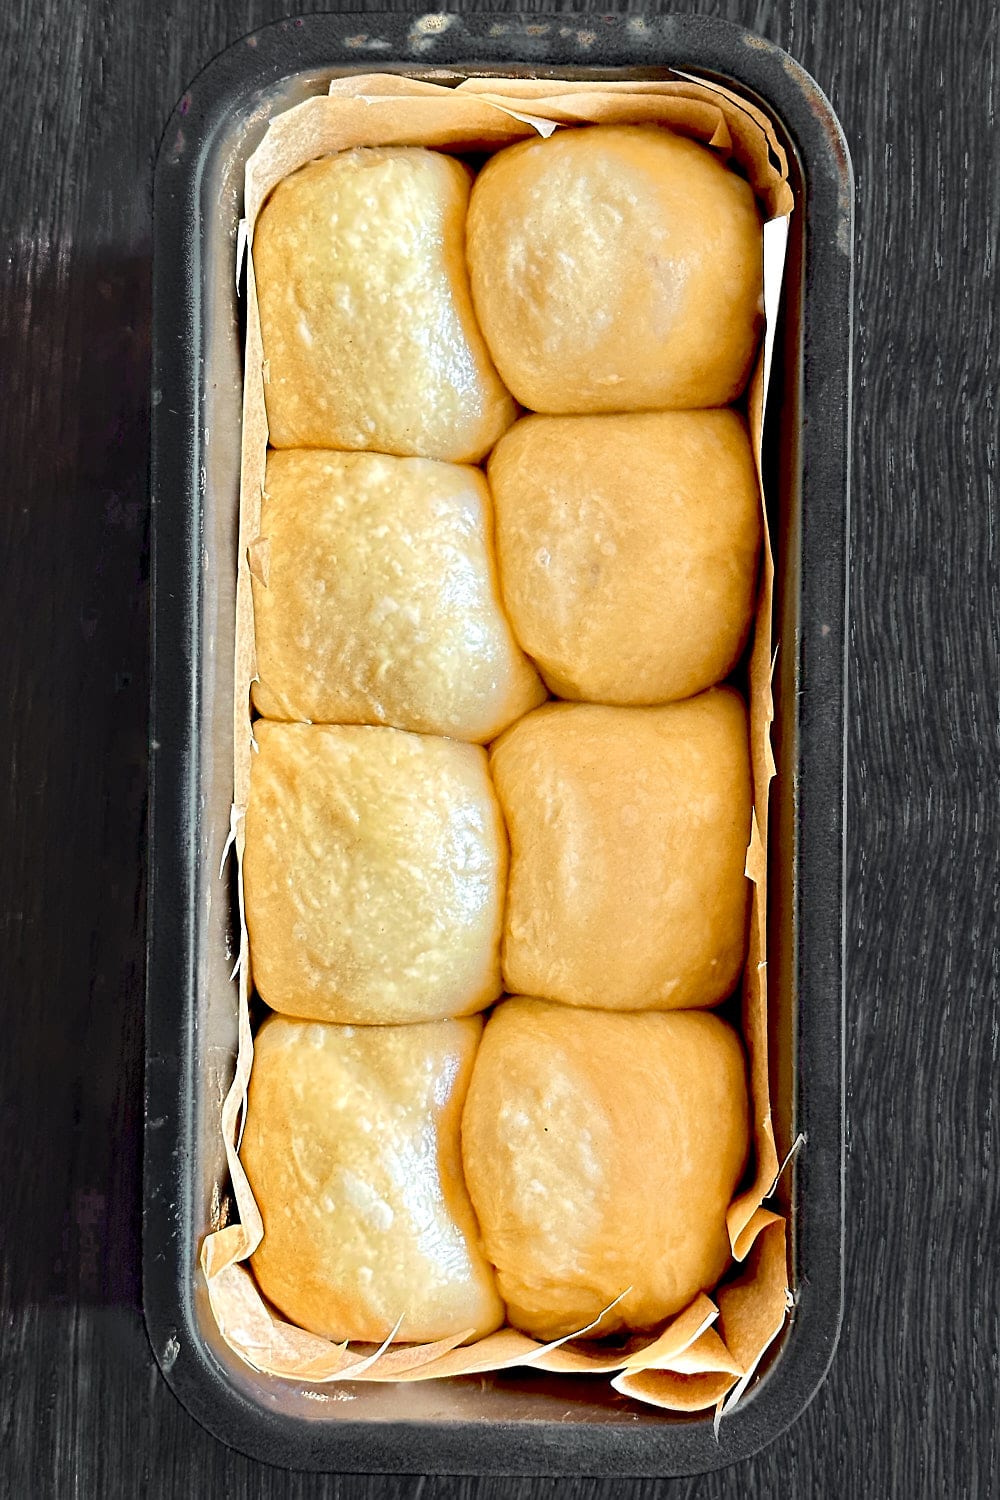
After the bulk fermentation, line a loaf pan with parchment paper and set it aside. To shape the brioche the traditional way, divide the dough into eight equal pieces. I recommend using a kitchen scale to weigh the pieces and ensure that they’re all the same size. Shape each dough piece into a tight, round ball. Place the dough balls into the prepared loaf pan. Cover the pan with plastic wrap and place it in the fridge overnight.
Day 2 | Step 1:
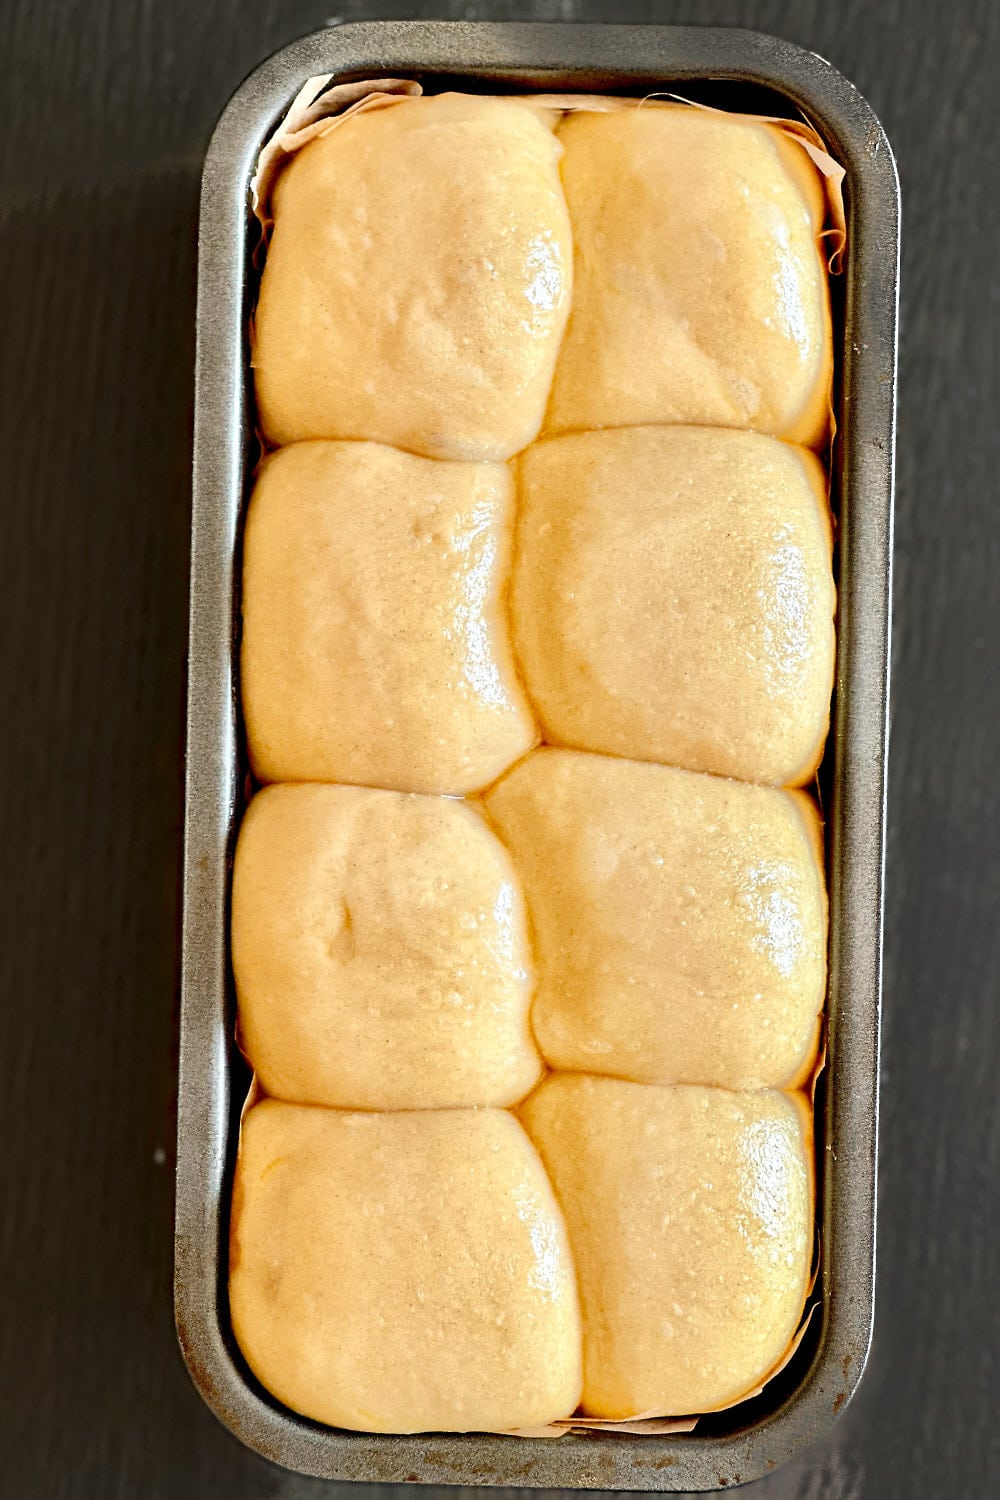
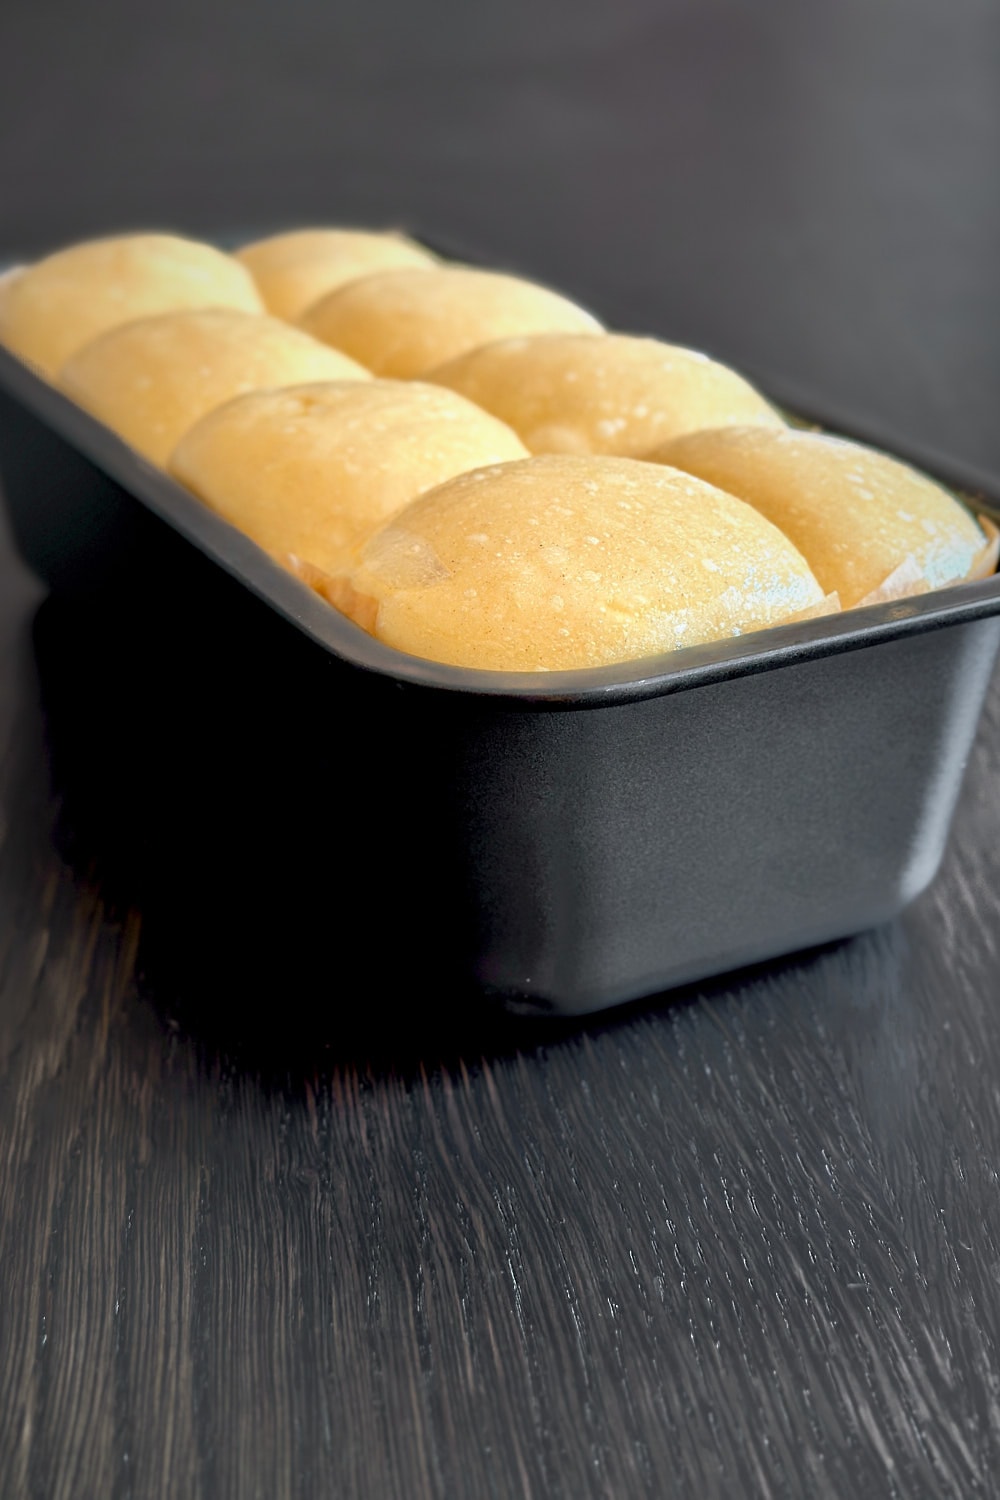
The next day, take the loaf pan out of the fridge and let the brioche proof in a warm spot (about 30 °C) for about 6 hours, or until the dough has doubled in size. For a warm proofing environment, you can proof the brioche in the oven with just the light turned on. Please keep in mind that the proofing time may vary depending on the temperature. At a cooler room temperature, the dough may need 8–10 hours to double in size. The dough is fully proofed when it has risen slightly above the rim of the loaf pan and looks very puffy and airy. If you gently poke it with a finger, it should almost feel like poking a balloon. In the pictures below, you can see how the dough changes its appearance and volume over the course of six hours during the final proof. In the beginning, it still looks dense. After about 4 hours, it has already significantly increased in size. After about 6 hours, it has risen above the rim of the pan and looks soft and airy.

After taking the brioche out of the fridge -
After 4 hours of proofing time -
Fully proofed after 6 hours in a warm environment
Day 2 | Step 2:
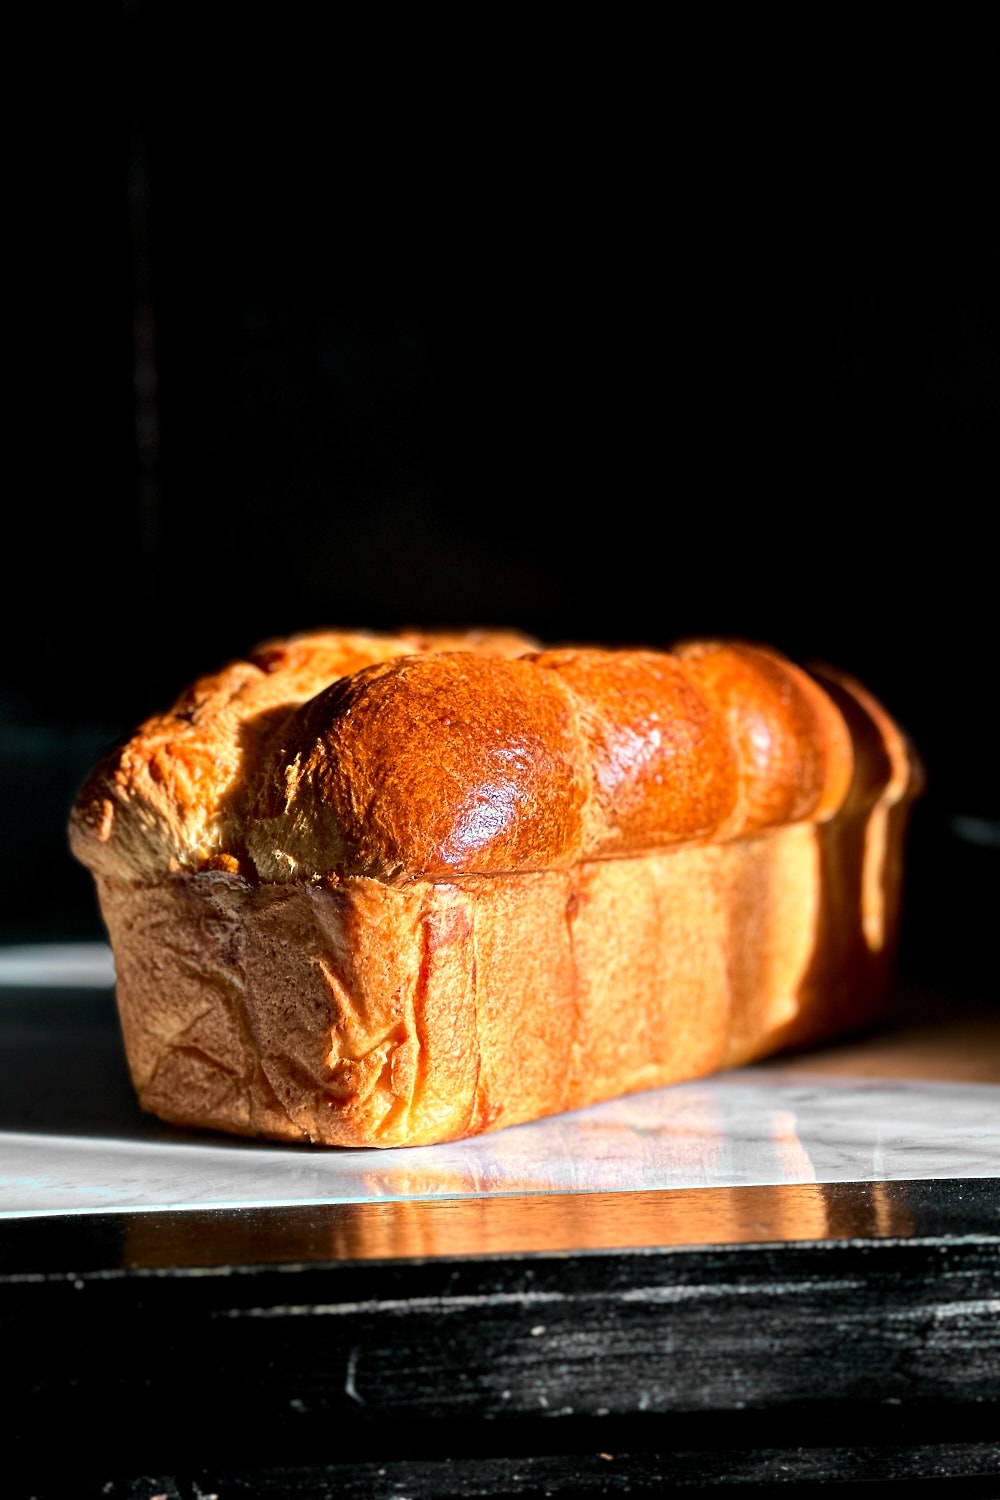
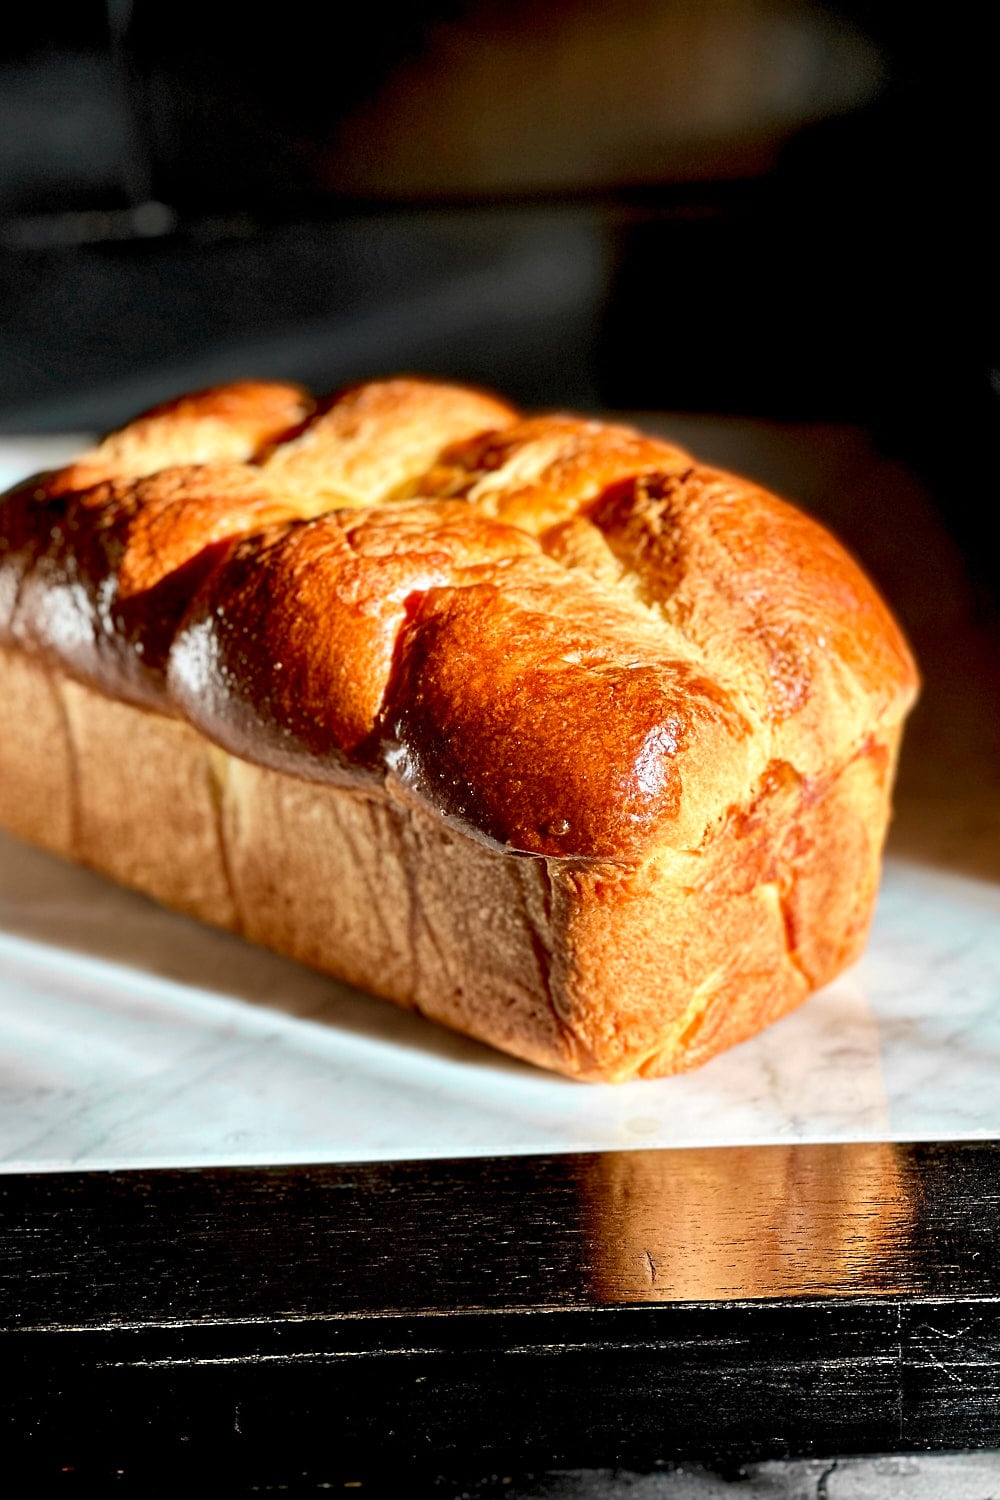
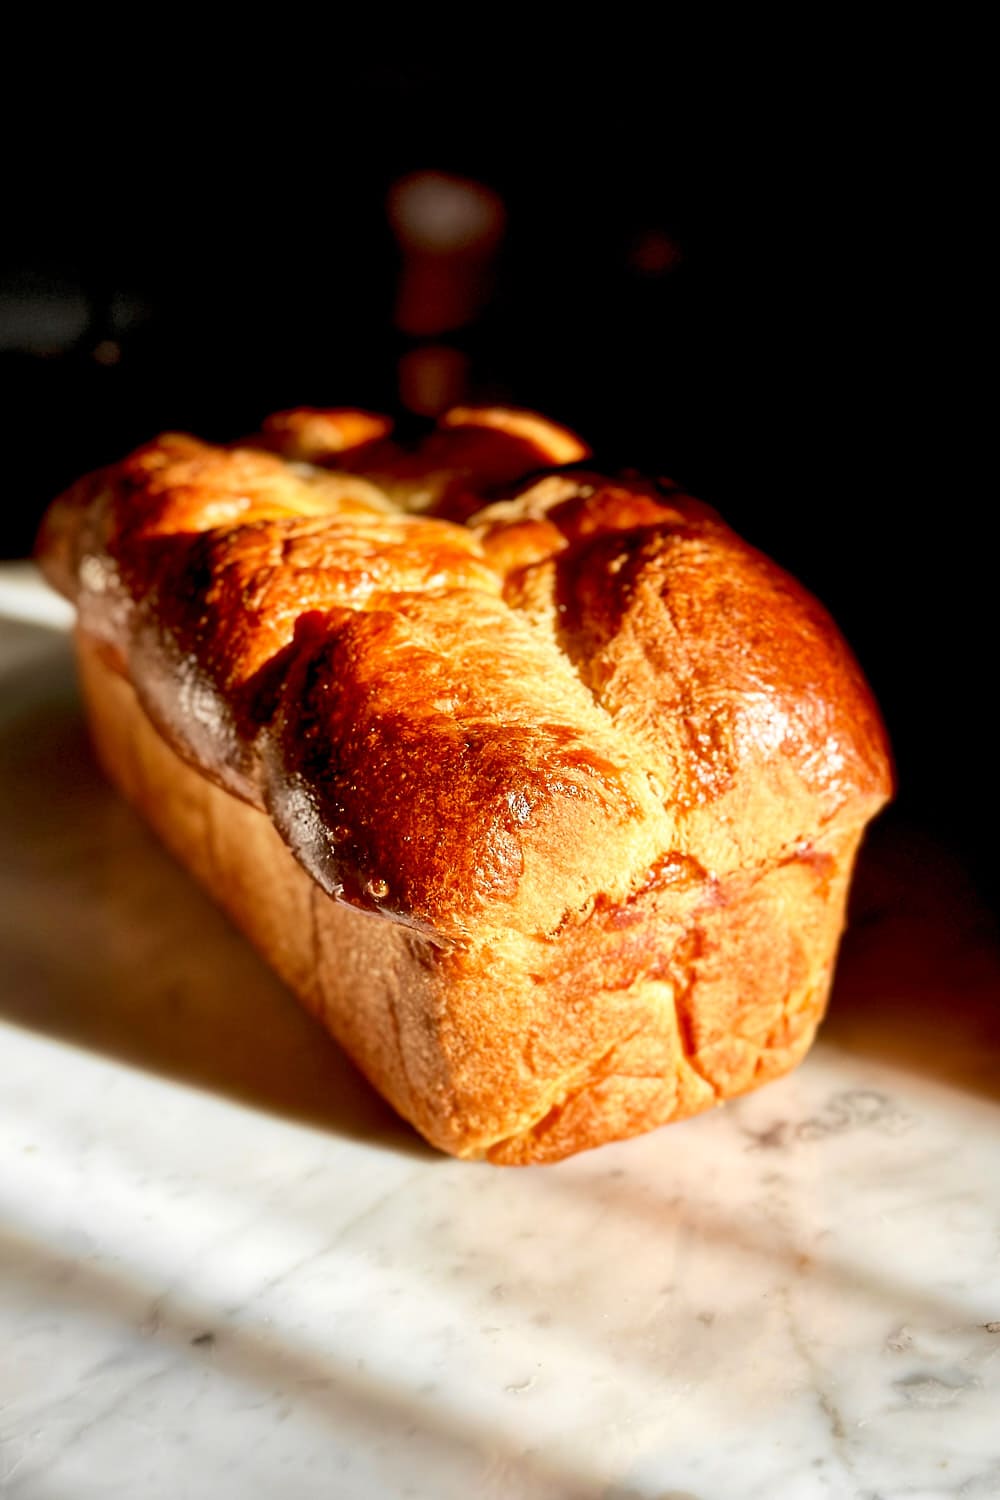
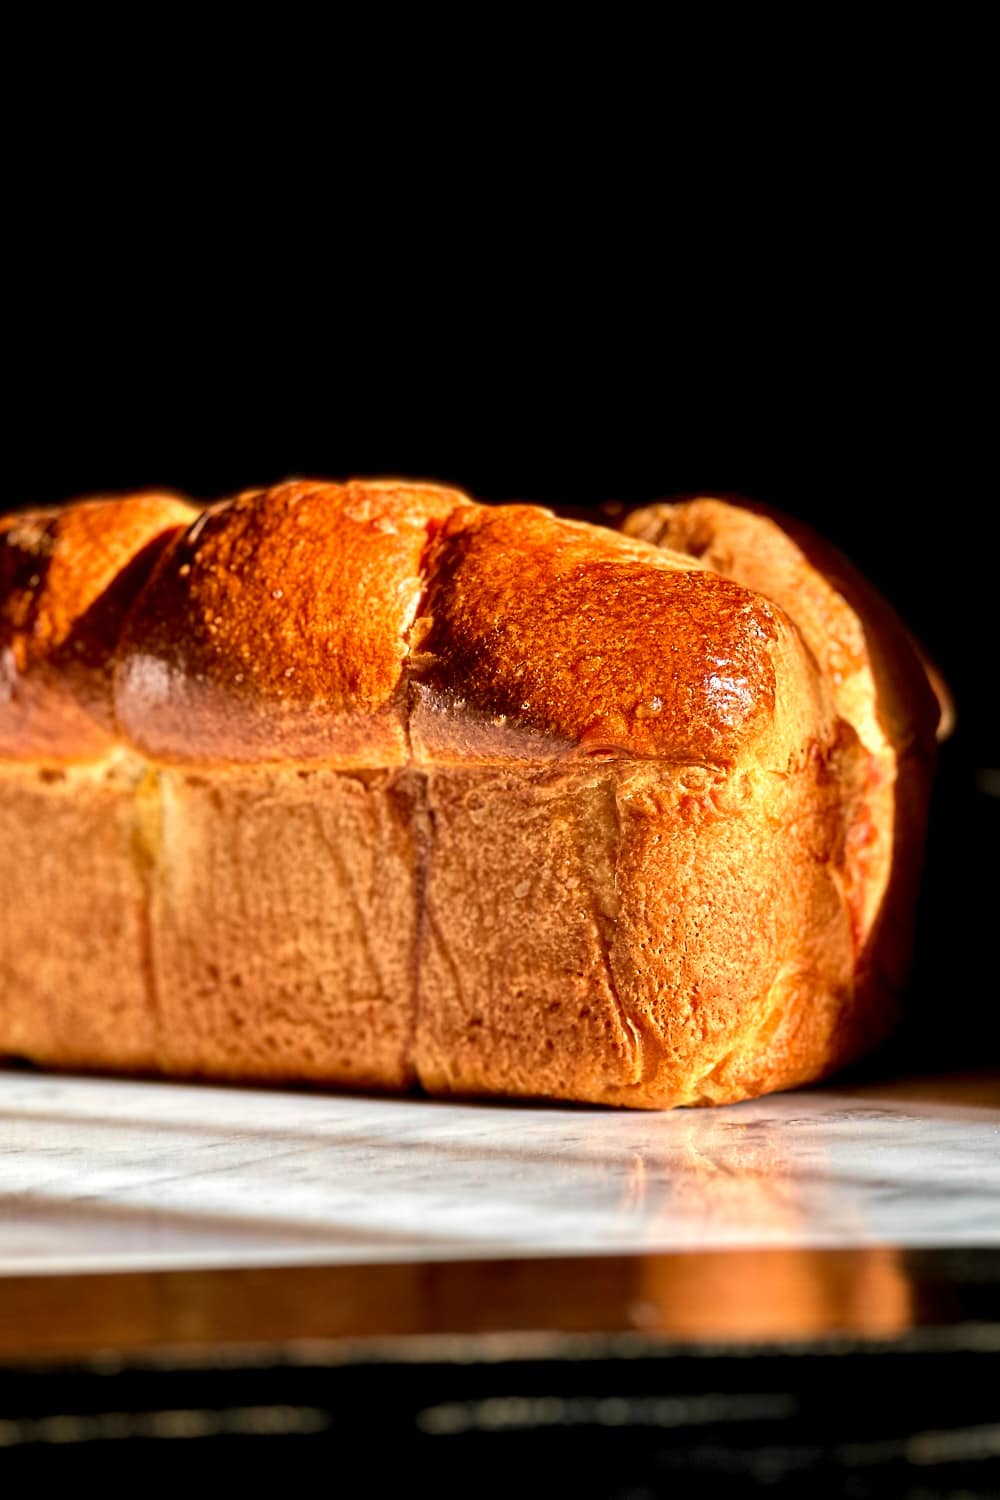
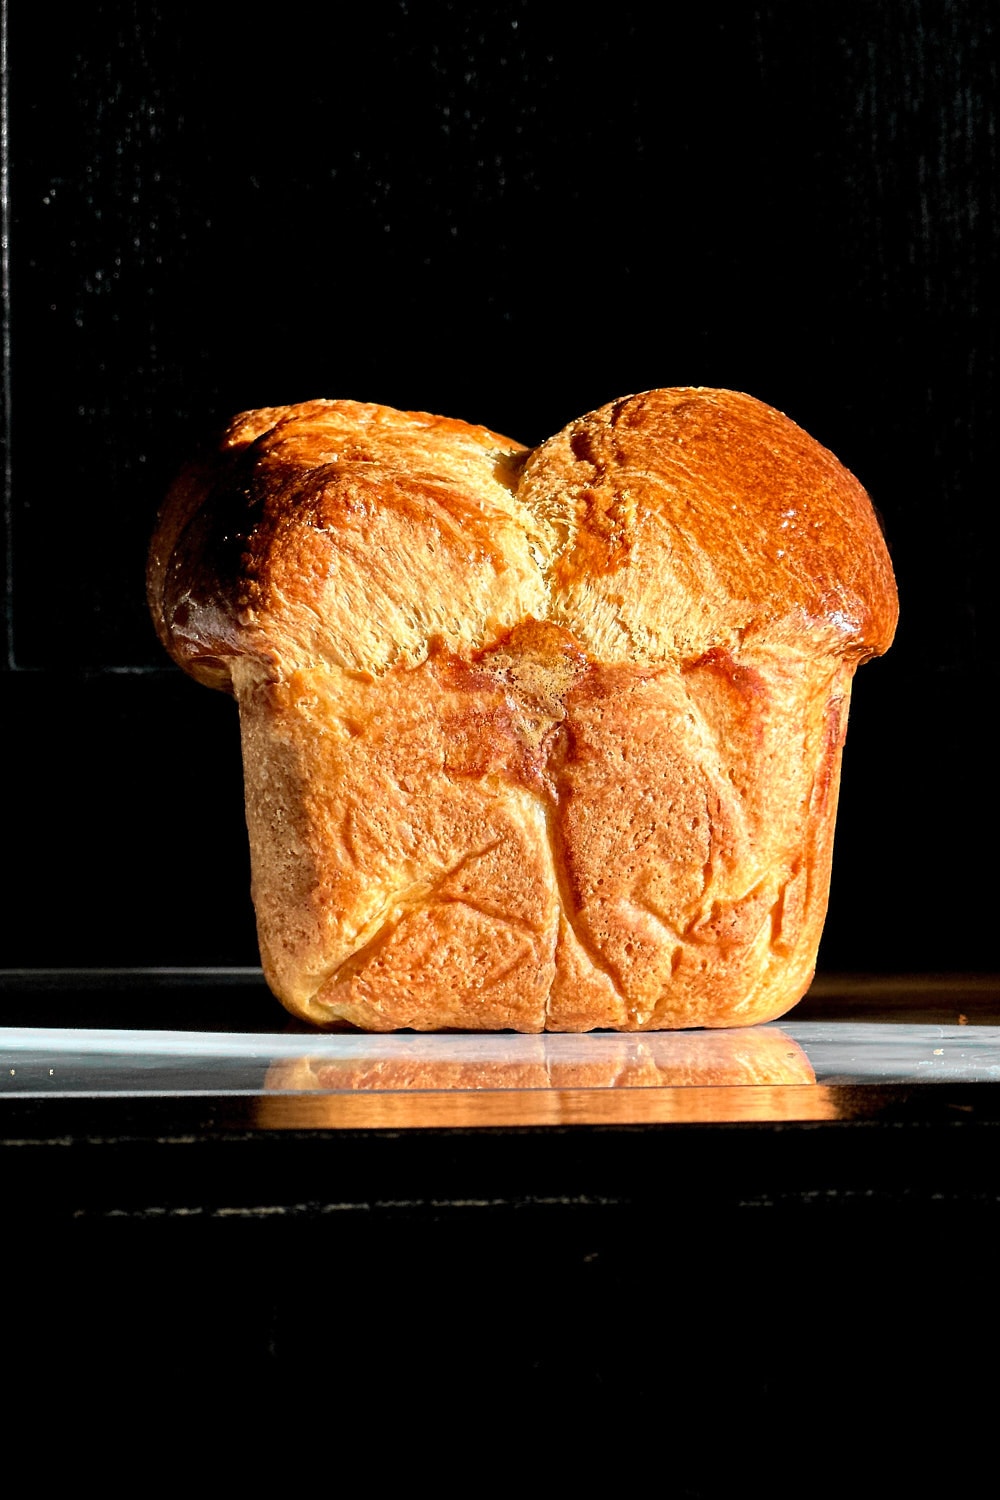
Pre-heat the oven to 180 °C. Brush the top of the loaf with egg wash and bake the brioche for about 35–40 minutes until deeply golden brown, or until the internal temperature reaches at least 94 °C. Due to the enrichments in the dough, the top of the loaf may brown quickly. You can loosely cover the loaf pan with aluminum foil midway through baking to prevent the top from getting too dark. When the brioche is done, take it out of the oven and let it rest in the loaf pan for about 10 minutes. Then, turn it out of the pan and let it cool completely on a wire rack.
Sample Baking Schedule
Day 1
Day 2
Common Questions About Sourdough Brioche
More Recipes You May Like:


Soft and Buttery Sourdough Brioche
Equipment
- Digital kitchen scale
- bench scraper
- Loaf pan – 9 x 5 inches ( ca. 23 x 13 cm)
- Parchment paper
- Stand mixer with paddle attachment and dough hook
- Pastry brush
Ingredients
For the sweet, stiff leaven:
- 25 g sourdough starter
- 35 g whole milk – lukewarm
- 15 g sugar
- 70 g flour
For the main dough:
- All of the leaven
- 3 eggs – medium size
- 55 g milk – cold from the fridge
- 110 g sugar
- 350 g strong bread flour
- 8 g salt
- 175 g butter – cut into cubes and softened
For the egg wash:
- 1 egg
Instructions
- DAY 1 | STEP 1:Make the leaven: In a mason jar, combine the sourdough starter, lukewarm milk, and sugar. Stir until the starter is almost fully dissolved. Then add the flour and mix until fully incorporated. The leaven will have a stiff, dough-like consistency. To make sure that the ingredients are well combined, you can also briefly knead it on the counter until it feels smooth and elastic. Then, place it back in the jar and cover it loosely with a lid. Let it rise in a warm spot (28 ° C – 30 °C) for about 4 – 6 hours. The leaven is active and ready to use when it has doubled (or tripled) in size, looks bubbly and airy, and has a mild, slightly sweet aroma. Please keep in mind that the time to rise may vary depending on your room temperature and the activity of your starter. If your room temperature is on the cooler side, you can let the leaven rise in the oven with just the light turned on to speed up the process.
- DAY 1 | STEP 2:Make the main dough: Add the active leaven, eggs, milk, and sugar to the bowl of a stand mixer fitted with the paddle attachment. Mix on medium speed until the leaven is fully dissolved, and the mixture looks airy and frothy.
- DAY 1 | STEP 3:Switch from the paddle attachment to the dough hook and add the flour to the mixing bowl. Mix on low speed for a couple of minutes until the flour is fully incorporated. At this point, the dough will feel slack and quite sticky, but don’t worry; it will become smooth and elastic later on during the kneading process. Avoid adding any more flour at this stage, or the dough will become too dry. Cover the bowl with a damp tea towel and let it rest on the counter for about 30 minutes. This allows the flour to fully absorb the liquids and jumpstarts gluten development. While the dough is resting, take the butter out of the fridge and cut it into small cubes.
- DAY 1 | STEP 4:Add the salt and knead the dough on low-medium speed for about 5 minutes. Then, while the mixer is running, add the butter cubes, one by one, until the butter is fully incorporated. Increase the speed to medium-high and knead the dough until it becomes smooth and elastic. Depending on your mixer, it may take up to 30 minutes to develop enough dough strength. You’ll know the dough is fully developed when it releases from the sides of the mixing bowl and clings to the dough hook. After kneading, the dough should feel soft and smooth. It will have a slightly shiny surface and might feel slightly tacky but no longer overly sticky.
- DAY 1 | STEP 5:After mixing, place the dough in a lightly greased bowl and cover it with a damp tea towel or plastic wrap. Let it bulk ferment in a warm spot (ideally between 26 – 28 degrees) for about 4 hours. By the end of the bulk fermentation, the dough should look aerated with many small, visible bubbles throughout, but it doesn’t have to double in size during this time.
- DAY 1 | STEP 6:After the bulk fermentation, line a loaf pan with parchment paper and set it aside. To shape the brioche the traditional way, divide the dough into eight equal pieces. I recommend using a kitchen scale to weigh the pieces and ensure that they’re all the same size. Shape each dough piece into a tight, round ball. Place the dough balls into the prepared loaf pan. Cover the pan with plastic wrap and place it in the fridge overnight.
- DAY 2 | STEP 1:The next day, take the loaf pan out of the fridge and let the brioche proof in a warm spot (about 30 °C) for about 6 hours, or until the dough has doubled in size. For a warm proofing environment, you can proof the brioche in the oven with just the light turned on. Please keep in mind that the proofing time may vary depending on the temperature. At a cooler room temperature, the dough may need 8–10 hours to double in size. The dough is fully proofed when it has risen slightly above the rim of the loaf pan and looks very puffy and airy. If you gently poke it with a finger, it should almost feel like poking a balloon. In the pictures below, you can see how the dough changes its appearance and volume over the course of six hours during the final proof. In the beginning, it still looks dense. After about 4 hours, it has already significantly increased in size. After about 6 hours, it has risen above the rim of the pan and looks soft and airy.
- DAY 2 | STEP 2:Pre-heat the oven to 180 °C. Brush the top of the loaf with egg wash and bake the brioche for about 35–40 minutes until deeply golden brown, or until the internal temperature reaches at least 94 °C. Due to the enrichments in the dough, the top of the loaf may brown quickly. You can loosely cover the loaf pan with aluminum foil midway through baking to prevent the top from getting too dark. When the brioche is done, take it out of the oven and let it rest in the loaf pan for about 10 minutes. Then, turn it out of the pan and let it cool completely on a wire rack.


Hallo Julia,
ich bin noch recht unerfahrenen was das backen mit Sauerteig angeht. Ich backe immer nur Roggensauerteigbrot mit Roggenvollkornmehl, mein Ansatz ist auch mit Roggenbollkornmehl gemacht. Kann ich den Ansatz verwenden um einen süßen Ansatz zu machen? Und nehme ich dann dafür Weizenmehl W700? Ginge auch anderes Weizenmehl?
Vielen Dank für deine Hilfe,
Gwendolin